


A Home Assistant custom integration that predicts when your meat will reach a target internal temperature — like a Meater or other predictive thermometer, but using any temperature sensors you already have.
Probe-ability uses a two-layer prediction system:
1. ML model (primary) : Two gradient-boosted tree ensembles — one for the long horizon, one for the endgame — blended by how many degrees remain to target. Trained on 217 real cooks (129 from a Meater device, 37 Probe-ability exports and 51 anonymously shared community cooks) across beef, pork, poultry, lamb and fish, on ovens, smokers and pellet grills. It predicts time remaining from 17 features: current and starting temperatures, heating rate, deceleration, elapsed time, ambient temperature statistics, stall detection, and meat type. Replayed against real cooks, the typical (median) error is about 10 minutes, and about 11 minutes in the final stretch; early estimates are rougher and are shown as low confidence. The model is embedded directly in ml_model_code.py as pure Python — no external ML libraries or model files are required.
2. Physics model (fallback) : Newton's Law of Heating: fits an exponential curve to recent readings and solves for the time at which the meat will reach target temperature. Used automatically if the ML model is unavailable (prediction error or unexpected exception).
Both layers share the same data pipeline: readings are collected for ~10 minutes before any prediction is made, ensuring there is enough temperature history to compute the features the ML model needs.
Stall detection : During barbecue stalls (common with brisket and pork shoulder), heating rate drops near zero. Probe-ability detects this plateau and flags predictions as low confidence. The ML model was trained on cooks that include stalls and handles them significantly better than the physics-only fallback.
EMA smoothing : The time-remaining estimate is smoothed using an exponential moving average (α = 0.15) to dampen sensor noise without hiding real trends, preventing the display from jumping between readings.
Pull-from-heat warning : Meat continues warming after removal from heat (carryover cooking). Probe-ability estimates the carryover from the heating rate at the pull, shows a prominent warning when the meat reaches the pull temperature, then follows the rest and finishes the cook at its peak — reporting how far short it landed if the carryover didn't make the target.
- In HACS, go to Integrations → ⋮ → Custom repositories.
- Add
https://github.com/snelstim/Probe-abilityas an Integration repository. - Search for Probe-ability and install it.
- Restart Home Assistant.
- Go to Settings → Devices & Services → Add Integration and search for Probe-ability.
- Fill in the configuration form (see Configuration below).
- Copy the
custom_components/probe_abilityfolder into your HAconfig/custom_components/directory. - Restart Home Assistant.
- Go to Settings → Devices & Services → Add Integration and search for Probe-ability.
- Fill in the configuration form (see Configuration below).
Check the HA log for:
Probe-ability: ML model loaded
If this line appears, the ML model is active. If it's absent, predictions fall back to the physics model.
The card JavaScript is served automatically by the integration, no manual file copying needed.
In Lovelace, go to Edit Dashboard → Manage Resources and add:
- URL:
/probe_ability/probe-ability-card.js - Type: JavaScript Module
Then add the card to a dashboard (see Card configuration below).
The config flow is a one-time hardware setup. It does not ask for target temperatures or cook names — those are set per-cook from the Lovelace card.
| Field | Required | Description |
|---|---|---|
| Probe 1 sensor | Yes | Internal (meat) temperature sensor ; primary probe |
| Ambient sensor | Yes | Ambient (oven/smoker/air) temperature sensor |
| Probe 2 sensor | No | Second internal probe (optional) |
| Probe 3 sensor | No | Third internal probe (optional) |
| Probe 4 sensor | No | Fourth internal probe (optional) |
| Probe 1–4 name | No | Optional display name for each probe, e.g. Green or Red for colour-coded probes. Shown on the card (tiles, buttons, temperature row), in Live Activities and in the auto-stop notification instead of "Probe N". Change any time via ⋮ → Reconfigure. |
| Temperature unit | No | Display unit for the card — Celsius (default) or Fahrenheit |
| Export cook data | No | Save a CSV after every cook for local analysis/fine-tuning |
| Share anonymous cook data | No | Opt-in: send completed cooks to improve the shared ML model (see Anonymous data sharing) |
| Live Activities | No | Set after setup via ⋮ → Configure: pick the phones that get a cook-progress Live Activity (see Live Activities) |
Tip: All sensor entities must have the
temperaturedevice class. The entity selector in the config flow filters for this automatically.
Probe numbers follow the field, not the count. The sensor in Probe 4 sensor is always probe 4 — its entities end in
_probe_4, it isprobe_index: 3in service calls and "Probe 4" on the card — even when probes 2 and 3 are left empty. So a 4-probe thermometer of which you only use probes 1 and 4 can be set up exactly like that.
Temperature unit: Choose Fahrenheit to have the card show all temperatures (targets, presets, current/ambient readings, pull temp) in °F. This is a display-only setting — internally everything is stored in Celsius, and probe readings are normalized to °C automatically based on each sensor's own
unit_of_measurement, so a probe that reports in °F won't be double-converted. Change it any time via ⋮ → Reconfigure.
Adding or removing probes later: ⋮ → Reconfigure also lets you add a probe or clear one you no longer use. Clearing a probe removes its time remaining / estimated completion entities as well.
Tip: Probe resolution matters. A probe that reports in 0.1°C increments gives the model much finer data to work with than one that rounds to the nearest 1°C — which produces a staircase signal that makes heating rate and deceleration features less accurate. If you have a choice of sensors, pick the higher-resolution one.
type: custom:probe-ability-card
entity: sensor.probe_ability_time_remaining| Option | Required | Description |
|---|---|---|
entity |
Yes | The primary time_remaining sensor entity ID |
entry_id |
No | Config entry ID, only needed when you have multiple instances of the integration installed. See Multiple instances |
probe_sensors |
No | Show only these probes: the sensor entity IDs (as configured in the integration) of the probes this card is for, e.g. for one card per probe. Omit to show every probe of the instance. See Probe availability. |
ambient_sensor |
No | Ambient (oven/smoker) sensor entity ID. If set, the card blocks starting a cook until this sensor is available and returning a valid reading. The ambient temperature displayed in the card comes from the backend sensor attributes regardless of this setting. |
target_temp_entity |
No | An input_number entity to link the card's target temperature to (probe 1 / combined mode). The card uses its value as the default target and writes changes back to it, so the card and a history-graph target line stay in sync — including before a cook starts. See Linking the target temperature. |
target_temp_entity_2 |
No | Target-temp input_number for probe 2 (individual mode). |
target_temp_entity_3 |
No | Target-temp input_number for probe 3 (individual mode). |
target_temp_entity_4 |
No | Target-temp input_number for probe 4 (individual mode). |
probe_layout |
No | How individual-mode probe tiles are arranged: vertical (default), horizontal or grid. See Probe tile layout. |
collapsible |
No | true (default) gives every probe tile a summary header that folds the tile open or closed; false keeps all tiles open. See Probe tile layout. |
entity — the main data source
This sensor's attributes provide everything the card displays: current temperature, target temperature, heating rate, stall detection, ambient temperature, and prediction model. Only the time_remaining sensors created by Probe-ability are valid here. In a multi-probe individual-mode setup, each probe has its own sensor (sensor.probe_ability_time_remaining_probe_1, etc.) with its own independent attribute set — pick the one for the probe you want as the primary display.
ambient_sensor — a readiness guard, not a data source
The ambient temperature shown in the card header comes from the ambient_temp attribute on the entity sensor (written by the backend integration). The card config's ambient_sensor field is used solely as a readiness check: if set, the card will show "No probe sensors available" and block the Start button whenever that sensor is unavailable, unknown, or reading zero. Leave it empty to skip this check and always allow starting.
probe_sensors — which probes this card shows
The card hides any probe whose sensor is unavailable, unknown, or returning 0 — so a disconnected probe disappears from the UI rather than showing stale data. It knows the sensors from the integration itself (the probe_sensors attribute), so you normally leave this option out and get every probe of the instance. Set it to limit the card to some of them — for example one card per probe — by listing their sensor entity IDs exactly as configured in the integration. Entries are matched by entity ID, so the order does not matter, and an entry that is not a sensor of this instance is ignored. Probes that are not configured in the integration are never shown.
If you also plot your cook on a history graph, that graph's target line usually needs an
input_number helper — which means keeping the target in two places and syncing them by hand.
Set target_temp_entity to that input_number to make it the single source of truth:
- Read: the card uses the
input_number's value as the default target temperature in the idle form (in the card's displayed unit). Change the helper — e.g. from a dashboard slider or an automation — and the card's default follows, even before the cook starts. - Write: whenever you change the target in the card (type a value, pick a doneness preset, or
start a cook) the card writes it back to the
input_numberviainput_number.set_value, so the graph's target line updates automatically.
Multiple probes. Each probe has its own target, so each has its own optional helper:
target_temp_entity covers probe 1 (and combined mode, where all probes share one target),
while target_temp_entity_2 to target_temp_entity_4 cover probes 2–4 in individual mode.
Leave any of them empty to leave that probe unlinked. A single-probe setup only needs
target_temp_entity.
Only input_number entities are supported (they are the only settable numeric helper). Selecting
a doneness preset still overrides the target with the preset's temperature, as before. During a
running cook you can keep the model's target in sync from an automation using the
probe_ability.set_target action.
type: custom:probe-ability-card
entity: sensor.probe_ability_time_remainingtype: custom:probe-ability-card
entity: sensor.probe_ability_time_remaining
entry_id: abc123def456
ambient_sensor: sensor.smoker_ambient_temperature
target_temp_entity: input_number.cook_target_temperature
probe_layout: grid
probe_sensors:
- sensor.probe_1_temperature
- sensor.probe_2_temperature
- sensor.probe_3_temperature
- sensor.probe_4_temperatureThe card starts in idle mode. Before pressing Start, choose your cook setup:
- Combined mode : all probes monitor the same piece of meat (e.g. a brisket with probes in different spots). One target temperature, one shared timer showing when the slowest probe reaches target.
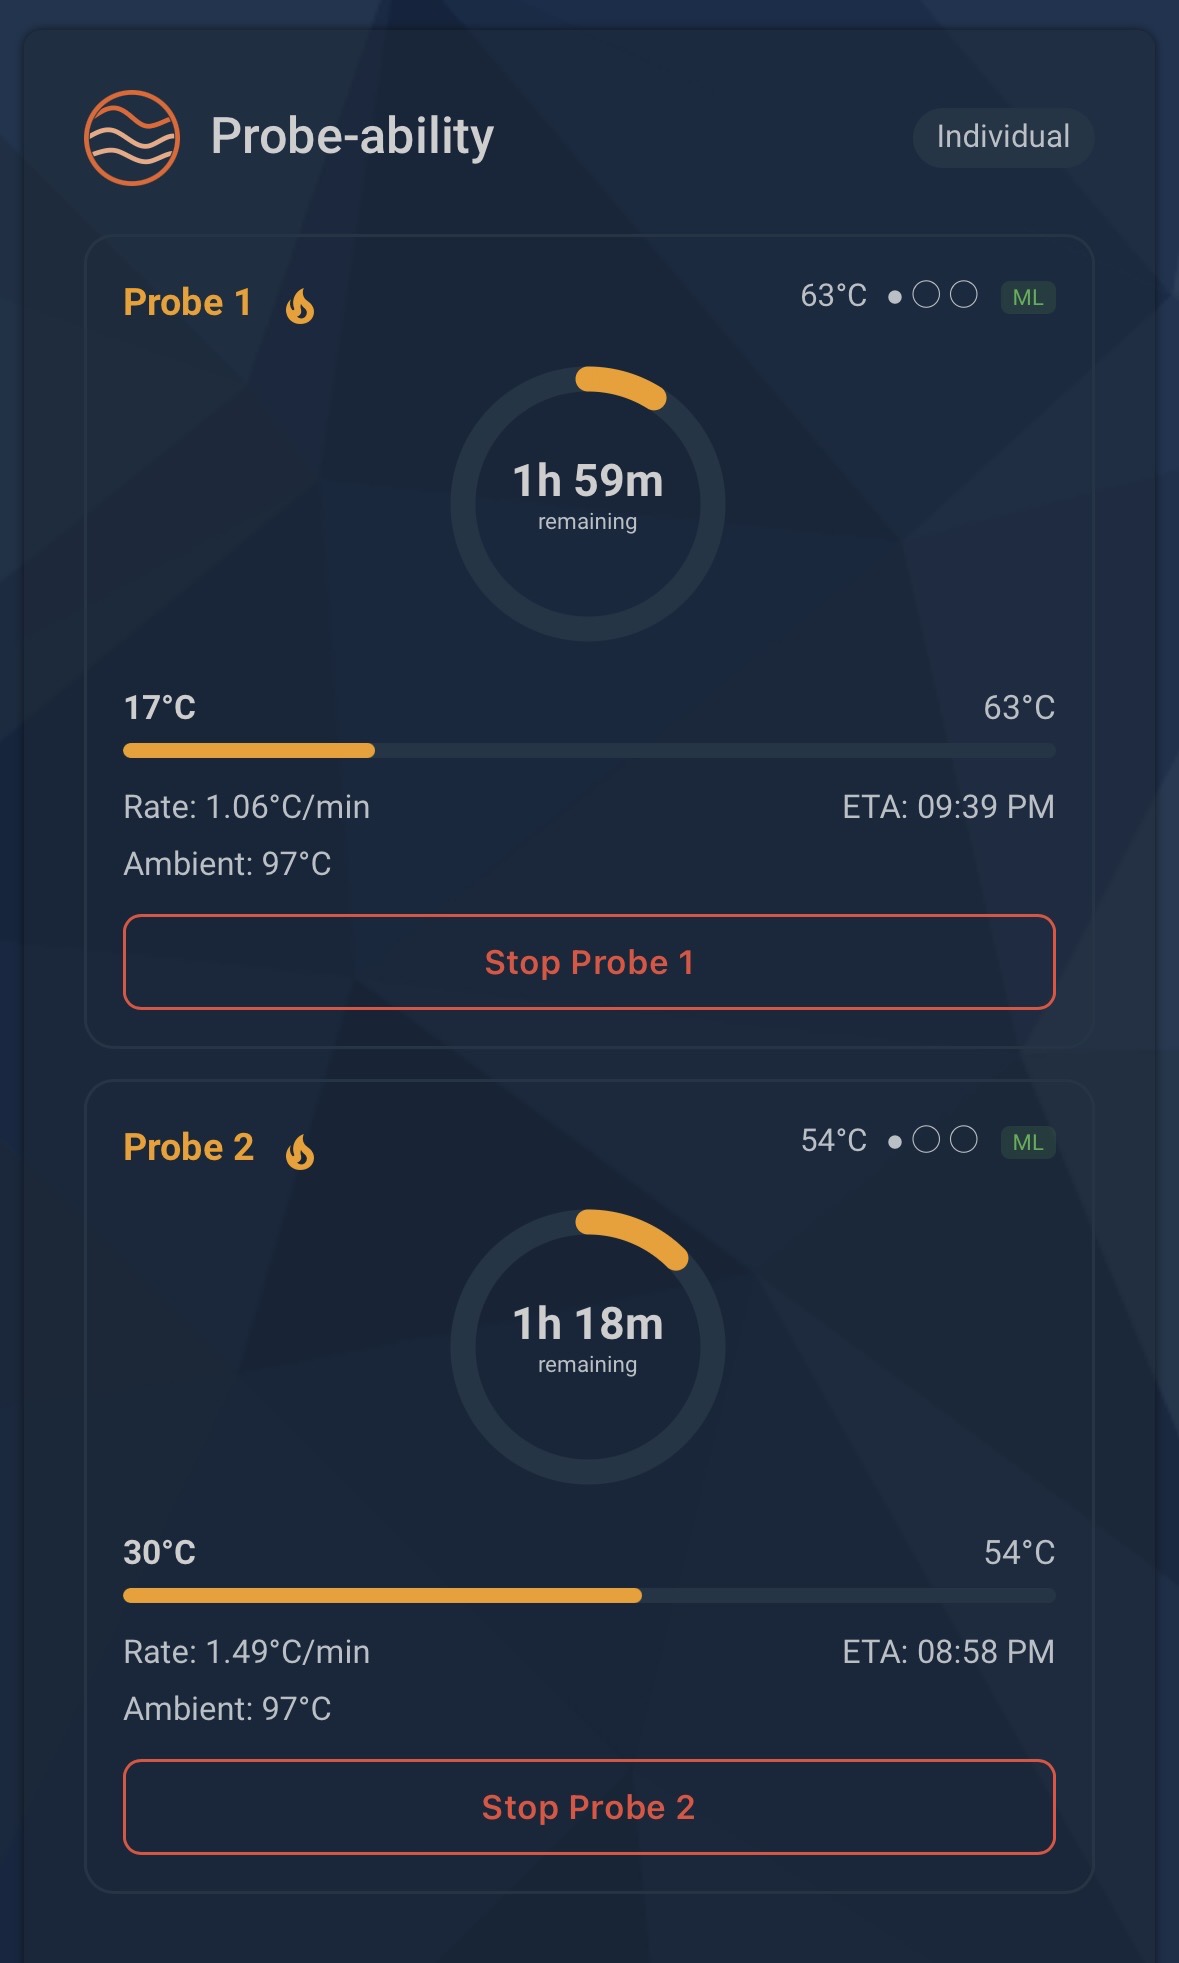
- Individual mode : each probe is independent (e.g. 3 steaks at different doneness levels). Each probe gets its own target temperature and countdown timer.
Pick a preset from the dropdown (e.g. Beef Sirloin Medium Rare - 54°C) or type a custom target temperature, then press Start Cook (combined) or Start Probe N (individual).
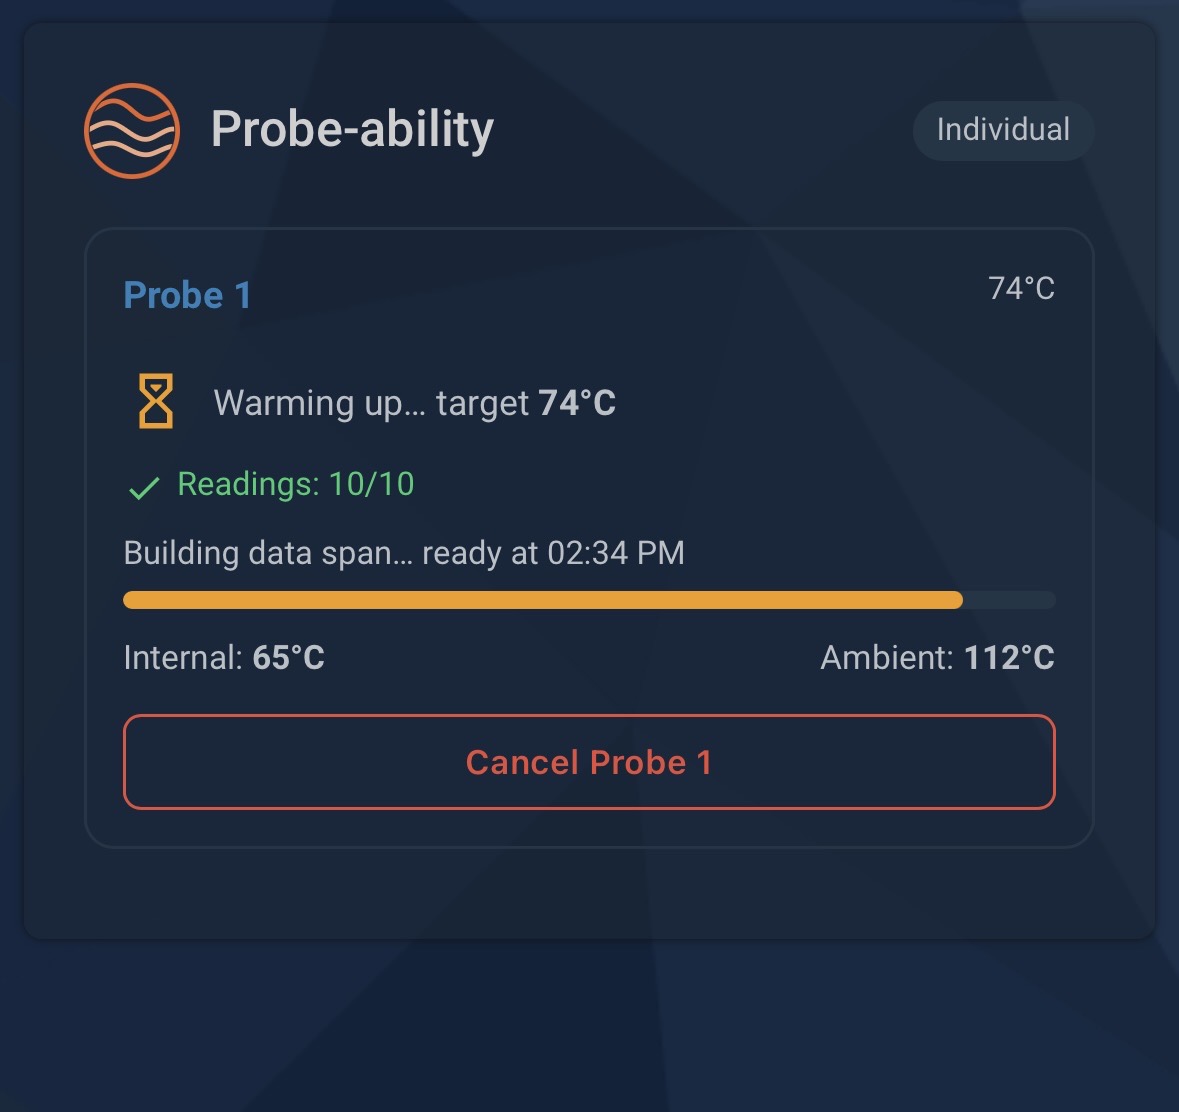
After starting, the card shows a progress bar while gathering the minimum data needed to make a reliable prediction (~10 readings over ~10 minutes). The bar fills in two phases:
- Phase 1 : reading count bar fills to 10/10
- Phase 2 : data span bar fills as the 10-minute window accumulates, with a "Ready at HH:MM" estimate
You can cancel during this phase.
Once enough data is collected:
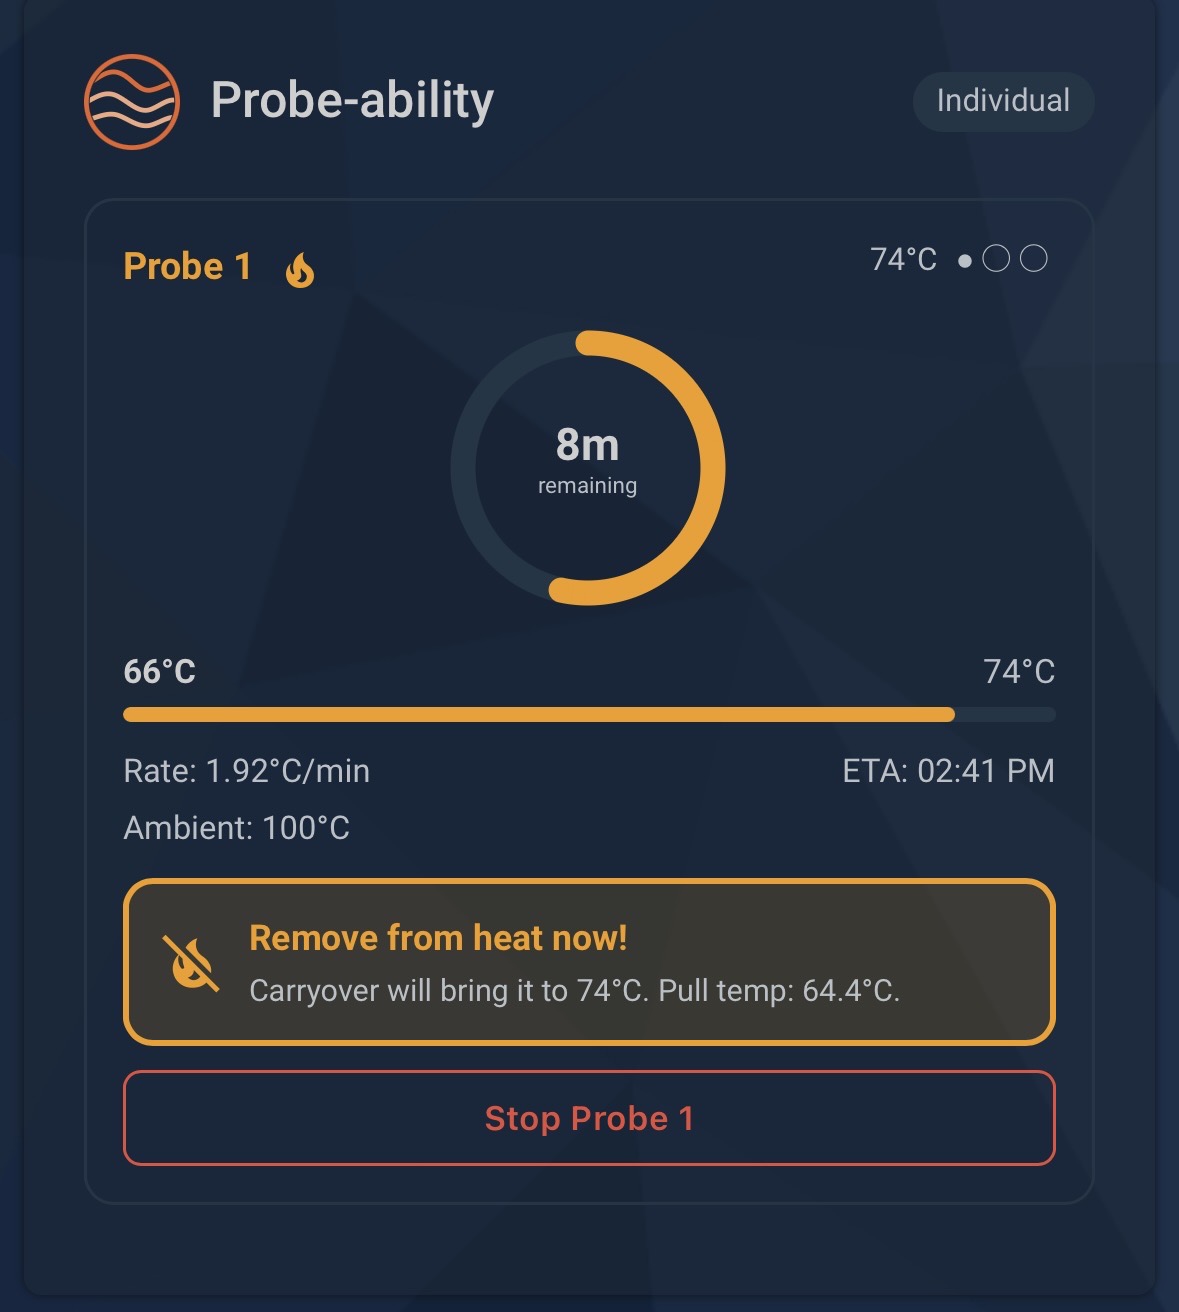
- The card shows a circular ring timer with the time remaining
- Tap the ring to toggle between countdown (ring drains as time passes) and temperature (ring fills as temperature rises toward target). A faint hint inside the ring shows which mode you're in.
- Current internal and ambient temperatures, heating rate, ETA, cook phase, and confidence level are displayed
- When the meat approaches the pull temperature, a prominent warning appears telling you to remove it from heat now
- Once the cooker's ambient temperature collapses for good (the meat is off the heat) the card switches to Resting, tracks the carryover rise, and finishes the cook at its peak — Rested — peaked at 78.6°C, 3.4°C below target — so a rest that lands short still completes instead of waiting forever. A brief lid/door dip is ignored, and a probe pulled out with the meat is not mistaken for a rest.
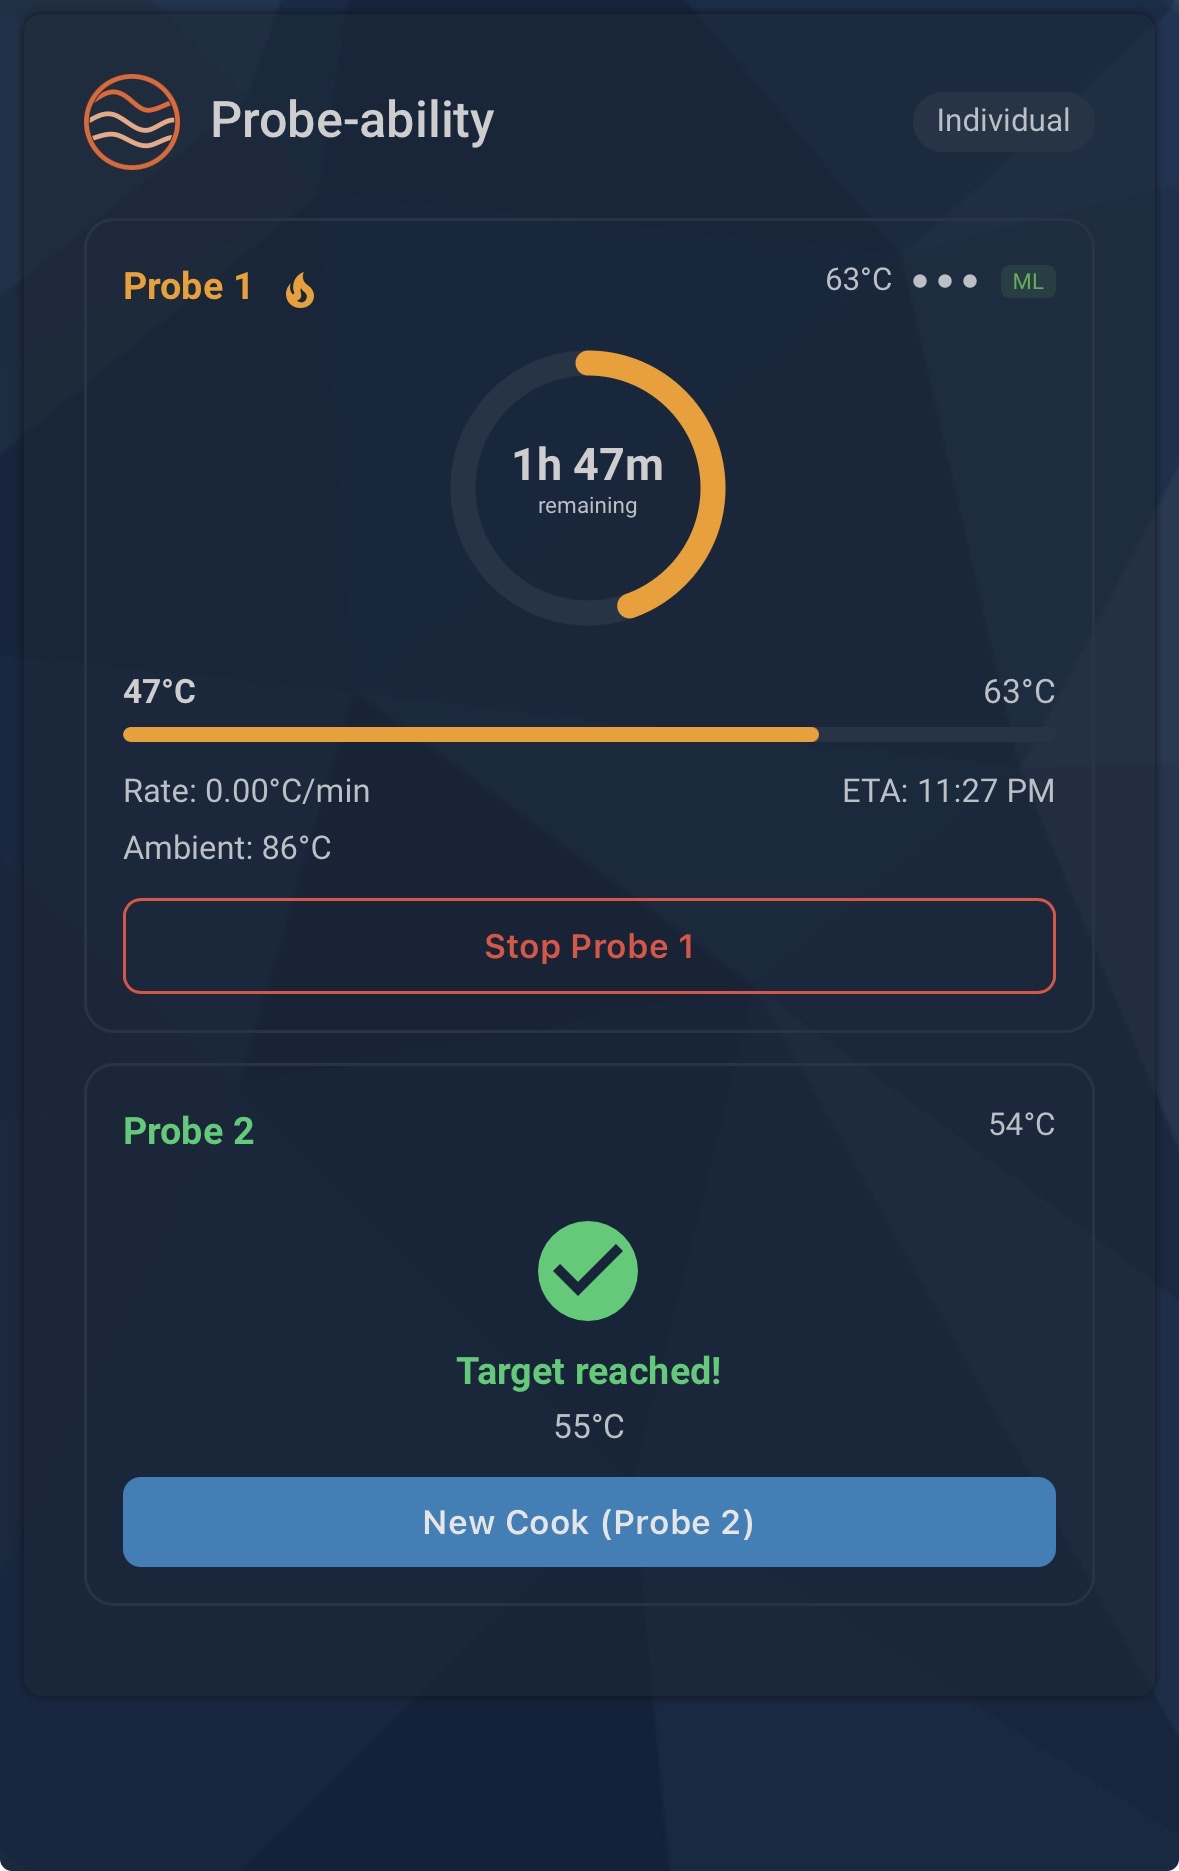
When the target temperature is reached the card shows a completion screen. Press New Cook to reset and start again.
Probes are called Probe 1, Probe 2, … by default. Many thermometers colour-code their probes, so you can give each one a name (e.g. Green) in Settings → Devices & services → Probe-ability → ⋮ → Reconfigure. The names replace "Probe N" everywhere: card tiles and buttons ("Start Green", "Stop Green"), the combined-mode temperature row, Live Activity titles and the auto-stop notification.
In individual mode every probe gets its own tile. Two options (visual editor → General, or YAML) control how the tiles are arranged and whether they fold up:
| Option | Values | What it does |
|---|---|---|
probe_layout |
vertical (default), horizontal, grid |
vertical stacks the tiles. horizontal puts all probes in one row — 2 probes sit side by side on any card, while 3 or 4 need a wider card (make the card span 2–3 dashboard columns) and wrap onto extra rows until then. grid uses 2 columns, so 4 probes form a 2×2 block. Every tile needs about 150 px of width; below that a column is dropped rather than squeezing the tiles. |
collapsible |
true (default), false |
With true each tile has a summary header — phase icon, preset, time remaining, current → target temperature and a thin progress bar — that you tap to open or close the full tile (ring, rate, ETA, buttons). With 1 or 2 probes tiles start open; with 3 or 4 they start closed. A pull-from-heat alert is shown on the closed row as well, and your open/closed choices are remembered per probe in the browser. With false every tile is always fully open. |
type: custom:probe-ability-card
entity: sensor.probe_ability_time_remaining
probe_layout: horizontal   # two steaks side by side
collapsible: false
Combined mode is unaffected — it always shows a single tile.
The card checks the probe sensors in real time — the ones configured in the integration, limited to the probes named in the card's probe_sensors if that is set — before showing the idle form:
| Available probes | UI shown |
|---|---|
| 0 | Warning message : no start button |
| 1 | Single form, no combined/individual toggle |
| 2–4 | Full UI with mode toggle; only available probe slots shown in individual mode |
Only probes that exist in the integration are shown: with probes 1 and 4 configured the card offers exactly those two, and starting the second one starts probe 4. While the card cannot read the sensor list (for example while the integration is still starting) it assumes all probes are available and relies on the backend to raise an error if a probe is actually offline when you press Start. In that case a red notification toast appears in the HA frontend automatically.
One pair of entities is created per configured probe, numbered by probe slot — probes 1 and 4 alone give the probe 1 and the probe 4 pair:
| Entity | Probe 1 | Probe 2 | Probe 3 | Probe 4 |
|---|---|---|---|---|
| Time remaining | sensor.probe_ability_time_remaining |
sensor.probe_ability_time_remaining_probe_2 |
sensor.probe_ability_time_remaining_probe_3 |
sensor.probe_ability_time_remaining_probe_4 |
| Estimated completion | sensor.probe_ability_estimated_completion |
sensor.probe_ability_estimated_completion_probe_2 |
sensor.probe_ability_estimated_completion_probe_3 |
sensor.probe_ability_estimated_completion_probe_4 |
Entities are unavailable while idle or collecting (not enough data yet).
The primary time_remaining sensor (probe 1) exposes all attributes the card needs, including cross-probe data for probes 2–4:
Always present when active:
| Attribute | Type | Description |
|---|---|---|
active |
bool | True if any probe is currently running |
probe_mode |
string | "combined" or "individual" |
probe_count |
int | Probe slots in use: the highest configured probe number (1–4). The lists below have one entry per slot, empty slots included |
probe_active |
list[bool] | Per-probe active state |
probe_names |
list[str | null] | Configured display name per probe (null where unnamed) |
probe_sensors |
list[str | null] | Internal sensor entity ID per probe slot (null for an empty slot) |
Present when probe 1 is active:
| Attribute | Type | Description |
|---|---|---|
phase |
string | collecting, heating, stall, finishing, or done |
confidence |
string | low, medium, or high |
target_temp |
float | Target internal temperature (°C) |
current_temp |
float | Latest internal temperature reading (°C) |
ambient_temp |
float | Latest ambient temperature reading (°C) |
rate_c_per_minute |
float | Current (smoothed) heating rate |
readings_count |
int | Number of readings collected so far |
pull_temp |
float | Temperature at which to remove from heat (target minus the estimated carryover) |
pulled_at |
float | Internal temperature when the meat was detected leaving the heat (present only after a pull) |
rest_peak |
float | Highest internal temperature reached while resting (present only after a pull) |
message |
string | Human-readable status message (during stall etc.) |
Cross-probe attributes (when probes 2–4 are configured and active; N is the probe number, 2–4):
| Attribute | Description |
|---|---|
current_temp_N |
Current internal temp for probe N |
target_temp_N |
Target temp for probe N |
probe_N_active |
Whether that probe is running |
probe_N_phase |
Cook phase for probe N |
probe_N_confidence |
Confidence for probe N |
probe_N_time_remaining |
Minutes remaining for probe N |
probe_N_pull_temp |
Pull temperature for probe N |
probe_N_rate_c_per_minute |
Heating rate for probe N |
Start a new cook. If a sensor is unavailable when this is called, a red error notification is shown in the HA frontend.
| Parameter | Required | Default | Description |
|---|---|---|---|
target_temp |
No | 74 | Target internal temperature in °C |
cook_name |
No | "Cook" |
Name label for this cook ; also used by the ML model to select the correct meat type profile |
probe_mode |
No | "combined" |
"combined" or "individual" |
probe_index |
No | — | Which probe to start: its number minus 1 (0–3), so probe 4 is 3 even when probes 2 and 3 are unused. Only used in individual mode |
entry_id |
No | — | Target a specific integration instance (see below) |
Combined mode : omit probe_index. All configured probes with available sensors are started together.
Individual mode : set probe_mode: "individual" and probe_index to start one specific probe.
Tip: Use a preset name matching one of the card's built-in presets as
cook_nameto give the ML model the most accurate meat type context. The format is"Category Cut Doneness"— for example:
"Beef Sirloin Medium Rare","Beef Rib Eye Medium","Beef Brisket Fall Apart""Pork Shoulder Pulled","Pork Loin / Chop Well Done""Poultry Chicken Breast Medium","Poultry Duck Breast Medium""Lamb Leg Medium Rare","Lamb Rack / Ribs Rare""Bread Sourdough Baked","Bread Enriched (Brioche / Cozonac) Baked""Other Fish / Salmon Medium Rare"Custom names fall back to a generic "other" profile. The model has not been trained on bread yet, so the Bread presets use that same generic profile for now.
Stop a cook and clear data.
| Parameter | Required | Default | Description |
|---|---|---|---|
probe_index |
No | — | Stop only this probe: its number minus 1 (0–3). Omit to stop all probes |
entry_id |
No | — | Target a specific integration instance |
Change the target temperature mid-cook without interrupting data collection.
| Parameter | Required | Default | Description |
|---|---|---|---|
target_temp |
Yes | — | New target temperature in °C |
probe_index |
No | — | Update only this probe: its number minus 1 (0–3). Omit to update all |
entry_id |
No | — | Target a specific integration instance |
Every integration instance installed in HA gets a unique entry_id ; a string like abc123def456. Probe-ability uses this to route service calls and card state to the correct instance.
You only need entry_id if you have more than one instance of Probe-ability installed (e.g. one for the smoker and one for the oven). With a single instance, entry_id can always be omitted, the integration finds the only available instance automatically.
- Go to Settings → Devices & Services → Probe-ability
- Click on the integration entry
- The URL in your browser will contain the entry ID:
…/config/integrations/integration/probe_ability#entry_id=abc123def456
Alternatively, check config/.storage/core.config_entries and look for "domain": "probe_ability".
type: custom:probe-ability-card
entity: sensor.probe_ability_time_remaining
entry_id: abc123def456service: probe_ability.start_cook
data:
target_temp: 96
entry_id: abc123def456Install Probe-ability multiple times (once per independent set of sensors). Each instance gets its own config entry, entities, and entry_id.
Example: smoker + oven setup
| Instance | Sensors | Card entity |
|---|---|---|
| Smoker | sensor.smoker_probe, sensor.smoker_ambient |
sensor.probe_ability_time_remaining |
| Oven | sensor.oven_probe, sensor.oven_ambient |
sensor.probe_ability_time_remaining_2 (entity suffix set by HA) |
Use entry_id in each card and in any automations to target the right instance.
Note: Entity IDs for the second instance will be suffixed by HA to avoid collisions (e.g.
sensor.probe_ability_time_remaining_2). The exact suffix depends on your HA version.
automation:
  - alias: "Cook almost done"
    trigger:
      - platform: numeric_state
        entity_id: sensor.probe_ability_time_remaining
        below: 15
    action:
      - service: notify.mobile_app_your_phone
        data:
          title: "Almost done!"
          message: >
            Your cook is estimated to finish in
            {{ states('sensor.probe_ability_time_remaining') | round }} minutes
(target {{ state_attr('sensor.probe_ability_time_remaining', 'target_temp') }}°C).automation:
- alias: "Pull from heat"
trigger:
- platform: template
value_template: >
{% set cur = state_attr('sensor.probe_ability_time_remaining', 'current_temp') %}
{% set pull = state_attr('sensor.probe_ability_time_remaining', 'pull_temp') %}
{{ cur is not none and pull is not none and cur | float >= pull | float }}
action:
- service: notify.mobile_app_your_phone
data:
title: "Remove from heat now!"
message: >
Internal temp has reached the pull temperature.
Remove from heat and rest — it will coast up to target.script:
start_brisket:
alias: "Start brisket cook"
sequence:
- service: probe_ability.start_cook
data:
target_temp: 96
cook_name: "Beef Brisket Fall Apart"
probe_mode: combinedProbe-ability can show the running cook as a Live Activity on your phone — on the iOS Lock Screen and Dynamic Island, or pinned to the top of the Android notification shade and always-on display. No automation needed: the integration starts, updates and ends the activity itself.
- Home Assistant Companion app on iOS 17.2+ or Android 16+
- Home Assistant 2026.7 or newer for iOS (needed for the Live Activity token handshake; Android works on older cores)
- The phone must be registered with the Companion app so it has a
notify.mobile_app_<phone>action
- Settings → Devices & services → Probe-ability → ⋮ → Configure
- Pick one or more phones (
mobile_app_…) and submit — no restart or reload needed - Start a cook. The activity appears within a few seconds and disappears when you press Stop (or when the cook auto-stops)
Selecting a phone while a cook is already running starts the activity immediately; deselecting it ends the activity on that phone.
| Element | Content |
|---|---|
| Title | The cook name (e.g. Beef Brisket Fall Apart). Fixed when the cook starts — Live Activities cannot change their title later. |
| Chip | Current internal temperature in your configured unit |
| Progress bar | Temperature progress from the start temperature to the target |
| Countdown | Once a prediction exists (heating / stall / finishing), a countdown to the estimated finish that ticks on the phone itself. On the iOS Lock Screen the countdown replaces the message line. |
| Message | Phase and temperatures, e.g. Heating · 63.5° / 95.0°, Stall · …, Target unreachable · raise the heat · …. Low-confidence predictions are marked. |
| Icon / colour | Match the card: fire (heating), pause (stall), flag (finishing), check (done), fire-alert (unreachable) |
When the target is reached the activity switches to Target reached at 100 % and stays there until you stop the cook.
- Combined mode → one activity, driven by the slowest probe; it shows done only when every probe has reached target.
- Individual mode → one activity per active probe, titled
<cook name> · Probe N. iOS shows at most two in the Dynamic Island.
Apple throttles Live Activity updates and drops them when they come too often, so Probe-ability only pushes when something meaningful changed:
- immediately on start, phase change, target change and target reached
- otherwise at most once per minute, and only when the temperature moved ≥ 0.5 °C, the progress percentage changed, or the estimated finish moved by ≥ 2 minutes
- the countdown itself never needs a push — the phone counts down on its own
- updates are marked alert once, so the phone (and a paired watch) only buzzes when the activity first appears and again when the target is reached — never on a routine temperature update
iOS ends any Live Activity after 8 hours. For long cooks Probe-ability rolls over to a fresh activity every 7 h 50 m (a 16-hour brisket uses two rollovers). Each rollover counts against iOS's push-to-start budget, which replenishes over time.
The activity survives a Home Assistant restart: a running cook is restored and re-pushed once Home Assistant has finished starting.
-
The phone is not in the list — the Companion app has not registered a
notify.mobile_app_…action yet. Open the app, check Settings → Companion app → Notifications, then reopen the Configure dialog. You can also type the service name by hand. -
The phone buzzes with a normal notification banner every minute instead of showing a Live Activity — the Companion app has not completed the Live Activity token handshake with Home Assistant yet, so every update is delivered as a regular notification. Open the Companion app once on that phone (with Home Assistant reachable) and let it sit on the dashboard for a few seconds; the next update starts a proper Live Activity and the routine updates become silent. Each phone needs to do this once after installing or updating the app.
-
Nothing appears on the phone — check the Home Assistant version (iOS needs 2026.7+), that the phone has a working connection to Home Assistant (remote access is needed for the token handshake), and that Live Activities are allowed for the Companion app in the phone's settings. Samsung phones may need Live notifications for all apps enabled in developer options.
-
Log lines — enable debug logging to see every push:
logger:
  logs:
    custom_components.probe_ability: debug
A selected phone whose notify action does not exist is logged as a warning once and skipped; it never interrupts the cook.
Enable Export cook data in the config flow to automatically save a CSV file after every cook. Files are written to config/probe_ability_exports/ and are named cook_YYYYMMDD_HHMMSS_probeN.csv.
Lines starting with # are metadata headers and can be skipped by most tools.
# probe_ability_export_version: 5
# integration_version: 0.6.1
# probe_index: 0
# probe_mode: combined
# cook_name: Beef Brisket Fall Apart
# target_temp_c: 96.0
# target_history: [[0.0, 96.0]]   (elapsed_s → target_c; more than one entry = target changed mid-cook)
# reached_target: true
# pulled_at_c: 77.2          (only when the meat was detected leaving the heat)
# rest_peak_c: 78.6          (highest temperature reached while resting)
# total_readings: 147
# export_timestamp: 2026-04-25T18:30:00.000000
elapsed_s,internal_temp_c,ambient_temp_c,predicted_remaining_s,confidence
0.0,22.50,120.00,,
32.1,22.75,121.00,,
645.0,29.00,125.00,4820.0,medium
...
predicted_remaining_s and confidence are empty during the initial collecting phase and populated from the moment predictions begin. They are generated by replaying the cook through a fresh predictor instance at export time, reproducing exactly what was shown live.
integration_version records which version of Probe-ability generated the file, useful for filtering data across versions when retraining the model.
Read in Python:
import pandas as pd
df = pd.read_csv("cook_20260425_183000_probe1.csv", comment="#")Enable Share anonymous cook data in the config flow to automatically send completed cooks to a shared dataset used to retrain the ML model. This is entirely opt-in and off by default.
What is sent:
- Cook name, target temperature, duration
- Internal and ambient temperature readings (downsampled to ≤200 points)
- Median ambient temperature
- Integration version
What is never sent:
- Your Home Assistant URL
- Any device or user identifiers
- Incomplete cooks (only cooks where the probe reached the target temperature are shared)
Shared rows carry the cook name, target, whether it was reached, ambient median, duration, the (downsampled) readings and — from v0.10.4 — the target history plus, when a rest was detected, the pull temperature and rest peak. Data is sent via an INSERT-only REST API secured with Row Level Security — anonymous clients can insert rows but cannot read, modify, or delete any data.
You can have export enabled without sharing, sharing enabled without export, both, or neither, they are independent settings.
| Detail | Value |
|---|---|
| Minimum readings before prediction | 10 readings AND 10 minutes of data span |
| Reading debounce interval | 30 seconds |
| Curve fitting window (physics fallback) | 40-minute sliding window |
| EMA smoothing factor (α) | 0.15 — half-life ≈ 4–5 readings (~2 min) |
| Carryover cooking model | clamp(2 × heating rate at the pull, min=1°C, max=8°C) — the rise after leaving the heat tracks the core-to-surface gradient (heat × size), not the oven temperature; validated against rested cooks in the export corpus |
| Stale probe exclusion (combined ETA) | Probe excluded after 5 minutes without a new reading |
| State persistence | Survives HA restarts — cook state written to .storage |
| External dependencies | None (ML model is pure Python, no packages needed) |
Primary — ML (blended gradient-boosted ensembles):
Two GradientBoostingRegressor ensembles (500 trees, depth 4) share the same 17 features: one is fitted to raw minutes remaining, which is best far from the target, the other to log-minutes, which is best in the endgame. The compiled score() blends them on degrees-to-go (raw model above 15 °C to go, log model below 4 °C, smoothstep between) and returns plain minutes.
The shipped model (v0.10.2, 13 September 2026) was trained on 217 real cooks — 129 Meater exports, 37 Probe-ability exports and 51 anonymously shared community cooks — across beef, pork, poultry, lamb and fish, on ovens, smokers and pellet grills: 1,832 training samples, taken at 10 %…90 % of each cook. For Meater exports the target is the preset's temperature (e.g. medium-rare beef → 54 °C); Probe-ability and community cooks use the target that was set. A cook that never reached its target is labelled to its actual peak (with the stall plateau trimmed) rather than the nominal target, and when a target was changed mid-cook each sample is labelled against the target in force at that moment. Predicts minutes remaining from 17 features:
| Feature group | Features |
|---|---|
| Temperatures | Current internal, starting internal, target gap, current ambient, mean/std ambient so far |
| Rates | Heating rate over the last 10 min and over the last 5 min, and their ratio (deceleration) |
| Time | Elapsed minutes |
| State | Stall flag (rate < 0.2 °C/min in the 40–80 °C zone) |
| Meat type | Category, animal, cut type, cut, doneness preset |
Accuracy (v0.10.5 code, shipped model), measured by replaying 67 real finished cooks through the integration and scoring every reading against the actual time-to-target (replay_harness.py in the training repository): mean absolute error 30 min, median 10 min. By phase of cook — first 30 %: 73 min (absolute minutes, dominated by multi-hour low-and-slow cooks), 30–60 %: 19 min, 60–90 %: 11 min, last 10 %: 11 min. Estimates shown as low confidence average 38 min off, high confidence 12 min. Meat type context is taken from the cook_name parameter — use one of the card's built-in presets for best accuracy; a preset with a typed temperature keeps its cut, and an unknown name is treated as a generic cook, exactly as in training.
Fallback — Physics (Newton's Law of Heating):
Fits the curve T(t) = T_ambient − (T_ambient − T₀) × e^(−kt) to recent readings via least-squares regression, then solves for when T = target. Switches to linear extrapolation during stalls or when ambient is too close to target. Used automatically when ml_model_code.py cannot be loaded or raises an unexpected error.
In combined mode the displayed ETA is max(time_remaining) across all active non-stale probes. This is correct because the cook is only done when all probes reach their target — so the slowest probe drives the timer.
The ML model is embedded in ml_model_code.py inside custom_components/probe_ability/ and is committed to git. If you re-clone the repository the model is already there. To update it after retraining, re-run retrain.py and copy the generated ml_model_code.py into the component folder.
python3 retrain.pyPlace Meater export files in meater_exports/ and/or Probe-ability CSV exports in probe_ability_exports/ before running. The script outputs a new ml_model_code.py (embedded model for HA, no model.pkl needed at runtime) and retrain_output/model.pkl. Copy ml_model_code.py to the component folder and restart HA.
The integration stores the ambient sensor entity ID at setup time. If your thermometer was re-paired, updated, or the Bluetooth integration changed how it names entities, the stored ID can become stale even though the sensor appears healthy in HA.
Fix: Settings → Devices & Services → Probe-ability → ⋮ → Reconfigure — re-select the correct ambient sensor entity and save. This is the most common cause of this error.
You can verify what entity the integration is actually checking by looking at the HA log (Settings → System → Logs, search probe_ability) after a failed start attempt.
One or more internal probe sensors are returning 0. This means the probe is physically not plugged into the thermometer unit. The Bluetooth connection may be fine, but the probe jack is empty — plug the probe in before starting.
If a probe is inserted but still reads 0, check the sensor state in Developer Tools → Template: {{ states('sensor.your_probe_entity') }}.
Same as above — every probe sensor the card watches (the integration's configured sensors, or those named in the card's probe_sensors) is returning 0 or unavailable. Check that all probes are physically connected to the thermometer.
Test the prediction algorithm standalone, without running Home Assistant:
python3 test_predictor.pyTest the Live Activity payload and throttle logic:
python3 test_live_activity.pyTest the Reconfigure flow and the config-entry update listener:
python3 test_config_flow.pyHelp translate Probe-ability into your language on Hosted Weblate, right in the browser. See docs/TRANSLATIONS.md for details.

If Probe-ability saved your brisket, consider a small donation — my cardiologist says I can't keep funding this research with my arteries alone.

